Slip-on shoes are perfect for someone like me who runs away from the hassle of tying and untying shoes. Unfortunately, shoes come with a traditional lacing style and are not slip-on. Luckily, we can convert our shoes to make them slip on.
You can make your shoes slip-on shoes using different lacing styles, like army lacing, straight bar lacing, and double cross lacing. In addition, you can use elastic shoelaces or lace anchors on your shoes to make them slip-ons.
Here are five easy ways to lace shoes so they slip on:
- The army lace style
- Straight bar lacing
- Double cross-lacing style
- Use elastic shoelaces
- Use lace anchors
Lacing your shoes doesn’t take long, but it can be frustrating when you’re in a hurry. Turning your shoes into slip-ons can make your life a little simpler and stress-free. Let’s see how you can do it.
How To Lace Shoes, So They Become Slip On?
Changing your shoes to slip-on shoes may take a couple of minutes but will save you a lot of time in the long run. Slip-on shoes are the perfect solution for a quick and relaxed way to wear your shoes.
Once you lace up your shoes, make sure they’re loose enough to slip on easily and tight enough to stay on. Shoes with plenty of cushioning on the inside tend to help with a better fit.
Be aware that your shoelaces may be longer or shorter using different lacing styles. If your laces are short, tying a knot at the end of each lace end can prevent them from slipping through the eyelets. If they are long, tying a permanent traditional knot might work.
Here are a few methods that will help you out:
1. The Army Lace
The army lacing style is the first on my list. It is easy to slip your shoes on and off with the army lacing method since the laces cross on the inside of the shoe. I recommend the army lacing method for thick leather boots since these shoes are less flexible.
Let’s see how to do it:
- To begin, insert the shoelaces through the lowest eyelets (the holes for laces to go through) of the shoe close to the toes. Next, feed the shoelaces so that the aglets (the hard metal or plastic ends) of the laces come out of the holes, and the shoelaces are pressed against the shoe tongue.
- Grab the shoelace on the left side and insert the aglet of the shoelace into the left eyelet directly above the first.
- For the right shoelace, repeat the same steps. Grab the aglet on the right side of the shoelace and insert it into the right eyelet directly above the first eyelet from where the shoelace came out.
- Grab the shoelace’s left and right sides and cross them diagonally over each other on the shoe. Now insert the left aglet of the shoelace from the third eyelet on the right side of the shoe and the right aglet from the third eyelet on the left side. Now the aglets of the shoelace are outside of the shoe.
- A basic pattern is created where you will have lines on the right and left sides of the shoe, and a diagonal cross is created at the center of the shoe.
- Repeat step 2 for both sides of the shoelace. Insert both the aglets down through the next eyelets on both sides.
- Repeat step 4. Grab the left and right aglets of the shoelace and cross them over each other against the tongue of the shoe. Then insert the two aglets coming up through the next set of eyelets.
- Repeat the above steps until you reach the top of the eyelets on the shoe.
2. Straight Bar Lacing

Another method to lace your shoes so they become slip-on is straight bar lacing. It is a more professional and clean-looking way to lace your dress shoes so you can easily slip them on and off when in a hurry. In addition, with straight bar lacing, you don’t have to tie and untie your shoes every time you put them on.
Let’s see how to do it:
- First, grab your shoes and keep them so that the toe end is facing you.
- Take your shoelace and thread it through the first two eyelets closest to the toe of the shoe. Next, thread the right aglet downward into the right eyelet and the left aglet downward through the left eyelet hole. This will create a first straight bar on your shoe.
- Grab the left aglet of the shoelace and thread it upward through the second eyelet on the left side of your shoe.
- Now Bring this left side of the lace over to the right side of the shoe and thread the aglet downward through the second eyelet on the right side. It will create a second straight bar.
- Both lace ends are now on the same side. Take the lace coming from the first eyelet and thread the aglet upward through the third eyelet on the right side of the shoe. Then take the lace coming from the second eyelet and thread it upward through the fourth aglet on the right side of the shoe. (As shown in the video)
- Now it’s time to cross both lace ends from the right side to the left side and insert each aglet downward. The lace from the third eyelet on the right side will go into the third eyelet on the left side. The same is true for the fourth eyelet. This will create a third and fourth straight bar.
- Both lace ends are now on the same side. Repeat the process until you reach the top with both laces on the same side.
- Take the lace second from the top, cross over to the opposite eyelet, and insert the aglet downward. Then, take the same lace and thread the aglet upward through the top eyelet on the same side.
- Finally, you can make a flexible knot if you want, and your slip-on shoes are ready to try on.
See this video for step-by-step instructions.
In learning this lace style, be prepared to spend 3-5 minutes untying and retying your shoes. Longer for more eyelets. If you make the laces too tight or loose, it may take a little more time.
Be aware that your laces will be longer if they are laced with a traditional lace style. Getting new shorter laces may be necessary to make them look nice. Otherwise, tucking them in or using a fancy knot can work.
3. Double Cross-Lacing Style
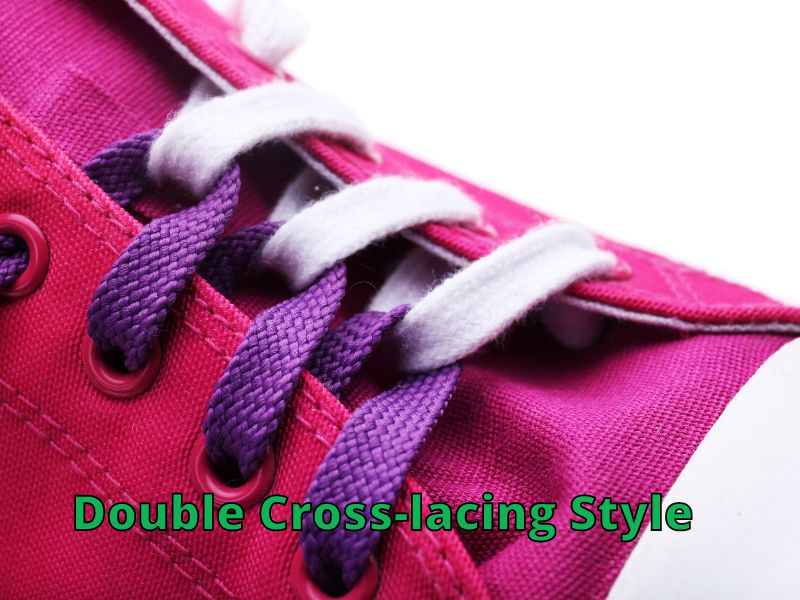
Another easy and fun way to lace your shoes to make them slip-on is the double cross-lacing style. This is one of the trendiest lacing styles since you can use two different colored laces with your shoes. It works well for both shoes and sneakers.
However, according to wearablyweird.com, double lacing best suits shoes with six or more eyelets.
For the double cross-lacing style, you’ll need two laces, knot them together, and thread through the eyelets.
Here are a few steps you need to follow:
- First, tie both laces together. Make sure to keep the knot tight and close to the shoelace tips.
- From the inside of the shoe, thread one lace through the lowest eyelet on the right side. Tuck the knot inside the shoe underneath the eyelet.
- Now take the aglet of the right shoelace and thread it down through the lowest eyelet on the left side. Make sure the shoelace aglet comes from above and goes inside the shoe. A straight bar will be created between the bottom two eyelets.
- Then crisscross both shoelaces over each other, making an X at the bottom of the shoe. Depending on your preference, you can keep either shoelaces above or below.
- Now twist both the shoelaces around each other.
- Then insert each shoelace tip into the second bottom eyelet. Make sure you are threading from outside to inside. You will see a double lace loop created above the tongue of the shoe.
- Now you have to repeat the steps to keep making double loops until you reach the end of the shoe. Next, make an X with both laces, twist the laces over each other, and insert from the opposite third eyelets.
- Continue the process until you fill all the eyelets and reach the shoe tongue.
- It’s finally time to make a bow. At this point, you’ll realize you have longer shoelaces to make a knot since you’ve used two shoelaces.
- You can simply tuck your shoelaces inside the shoe out of sight, and your slip-on shoes are ready. You can make a bow and hide it behind your shoe tongue for a neater and crisper look.
Here is a detailed video of how to do it.
4. Use Elastic Shoelaces

Using elastic shoelaces is another easy way to make your shoes slip on. Switching to elastic shoelaces will save you time since you need to tie them up once and pull them on and off effortlessly. Both kids and adults can use elastic shoelaces.
Using no tie or elastic shoelaces allows you to lace up your shoes quickly without having to tie and untie them each time. Elastic shoelaces come in 10 different sizes, and the size number is mentioned on each shoelace.
These shoelaces have a strap in the middle, two small arrowhead shapes at each end, and a thin nub to help hold them in place.
Here’s how you can install elastic shoelaces:
- Put one foot in the shoe with normal shoelaces tied to a comfortable snugness before measuring elastic shoelaces. Next, place the elastic shoelace so the arrowheads are placed over the eyelets from end to end.
- Don’t stretch the elastic shoelace. Once you find the correct size of elastic shoelaces for each pair of eyelets, it’s time to install them.
- Start with the two eyelets closest to your toe.
- Insert the right-side nub of the shoelace into the right eyelet of the shoe. Make sure the nub is pointing toward the interior of your shoe. Then, grab the nub from the other side of the eyelet and hold it tight to work the arrowhead through the eyelet.
- Once the arrowhead is inserted into the right eyelet, it’s time to insert the left nub. Next, do the same for the left nub to insert it into the left accompanying eyelet.
- Continue the process for each pair of eyelets above, and your slip-on shoes are ready.
Here is a video to help you find the correct size of elastic shoelaces and how to install them.
5. Use Lace Anchors
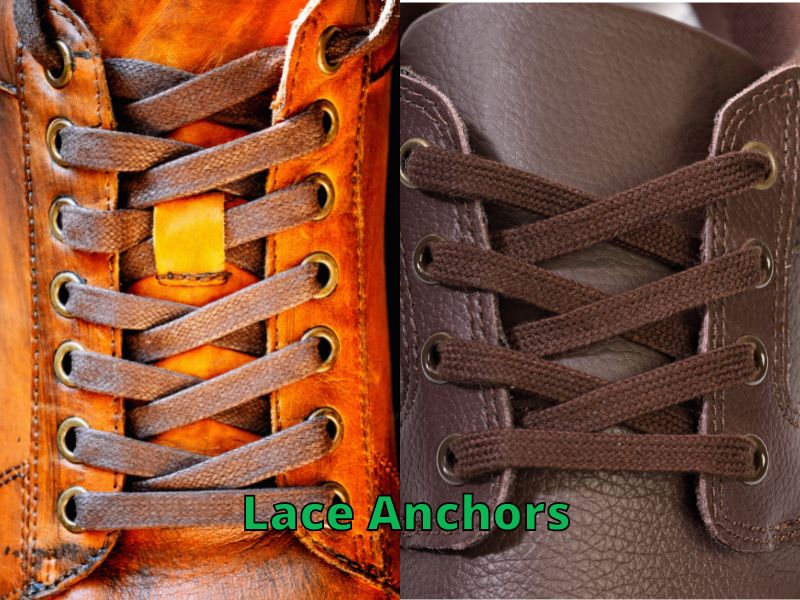
Lace anchors may look like small pieces of plastic, but they are much more than that. Lace anchors are great for keeping your shoelaces in place, thus making your shoes slip on. In addition, having lace anchors installed in your shoes means you don’t need to tie your shoelaces every time you put them on.
Using lace anchors is quite easy, and the best part is they are inexpensive, too. So let’s see how to use lace anchors.
- A lace anchor is a small piece of plastic with 2-3 holes. With one hand, hold the lace anchor and thread the shoelace through the top hole.
- Pull the lace anchor down near the top eyelet. Keep the shoelace straight and avoid any creasing.
- Now thread the shoelace aglet from the bottom hole on the lace anchor.
- You will see the lace anchor will create resistance and prevent your shoelace from moving.
- Pull the lace anchor close to the eyelet so it sits underneath it. The lace anchor will stop your laces from moving and slipping, just like a bow would do.
- Repeat the process to install the lace anchor on the opposite side.
- I recommend installing your lace anchor with your foot inside the shoe to ensure you can easily slip on and off your shoes.
- Once you have installed your lace anchors, you can trim the excess laces or simply make a bow and hide them behind the shoe tongue.
There are lots of ways to end your lacing style. You can leave them untied with a bit of lace sticking out from the top eyelets or you can tuck in the ends of the laces. You can also just tie a traditional knot and leave the laces loose enough to slip on easily with a knot.
Thanks for visiting helpshoe.com
References
charmyposh.com (WARNING: MAY NOT BE SAFE. I used some information from this website, but now my security software says it’s not safe.)