Sometimes I encounter many hills in the area around where I live. It can be fun to climb them and then go downhill quickly. On longer rides it can be important to take into account how much climbing you will be doing, so you are ready for the challenge.
Elevation gains while cycling can be measured by the total uphill distance traveled. Going up and down 10 hills can total more elevation gained than one long hill. Cyclists need to make sure they factor in the total effort needed, even if they’re not cycling to a higher elevation than where they started from.
Example:
- 10 Hills – 100 feet elevation gain and 100 feet elevation loss = 1000 feet of elevation gain
- 1 Hill – 850 feet elevation gain = 850 feet of elevation
I remember going on a bike ride where there were gentle hills to climb at first, but then came along, slightly steeper hill. It was easy at first but my legs wanted to give out after a while. I didn’t realize how the elevation gain over longer distances would tax my legs so much.
Determining the Effort Needed for Your Ride

While cycling over longer distances, it helps to calculate the total elevation gained while riding. Even if your hills are smaller climbs, added up they can total a large elevation gain over time.
To determine how well you can handle hills on your next ride, you want to think about the effort needed for level cycling and then increase it more as the gradient level increases.
One way to determine the effort needed is to wear a heart rate monitor as you climb hills. Try it on short hills and longer hills to get an idea of how much effort is required for various lengths of hills. You can also try this on various hill angles.
Depending on how you ride uphill, seated on the lowest gear or standing up on a higher gear, will change your effort and heart rate, so try to be consistent when measuring various hills.
Here are things to consider when determining the effort required when cycling uphill:
- Taking a short practice ride over some hills to get a feel for what a long ride with hills may feel like is a good practice.
- Longer hills may require extended effort over a shorter space of time than many easy hills. Be aware shorter hills can still tax your legs and body if you aren’t prepared.
- Consider the distance you have cycled uphill previously and how difficult it was. The angle or gradient of the incline can play a factor in your total effort, but shouldn’t be the main factor.
- Changing gears to adjust to the incline is important in maintaining an even level of effort as you cycle. A low gear can help lower effort levels significantly.
- To determine how far you can expect to travel comfortably without having to stop a lot and take breaks, you can measure the gains in elevation that you are normally used to and compare that to a new route that you plan to take.
- Different muscles may be needed and developed as you climb short hills or long hills during your regular cycling routine. The fast-twitch and slow-twitch muscles you already have can play a factor in the level of effort you need to use.
- Fast-twitch muscles burn more calories than slow-twitch, so depending on how you are climbing a hill on your bike will determine the total energy needed on your ride.
- Muscle recovery after climbing a hill plays a factor in how well you can climb a series of hills. Making sure you are hydrated and have electrolytes. Having a clear mind free from “mental fatigue” can also help with endurance over time. (sheebes.com)
- If your hills get more and more difficult throughout, your muscles may not be able to handle the last couple of hills well. If possible, plan a route that is consistent throughout, or easier at the end.
- When cycling for longer distances most cyclists agree that a “substantial amount of climbing is 100 feet per mile or 1,000 feet for every 10 miles” (blog.wahoofitness.com)
- Determine if your route has significant climbs and how big they might be.
- Look at the signs along the route to determine if there will be significant gains in elevation on one hill. Some hills should be avoided.
Here are some gradients that may occur (credit – theclimbingcyclist.com)
- 0%: A flat road
- 1-3%: Slightly uphill but not particularly challenging. A bit like riding into the wind.
- 4-6%: A manageable gradient that can cause fatigue over long periods.
- 7-9%: Starting to become uncomfortable for seasoned riders, and very challenging for new climbers.
- 10%-15%: A painful gradient, especially if maintained for any length of time
- 16%+: Very challenging for riders of all abilities. Maintaining this sort of incline for any length of time is very painful.
The total time you are traveling uphill is generally what will help you determine the overall effort needed for your entire ride. For this example, we will pretend the angle or gradient of the hills are the same and that the cyclists are using the same muscle types.
Example:
- 10 Hills – 3 minutes of effort each = 30 minutes of effort
- 1 Hill – 25 minutes of effort = 25 minutes of effort
Use an Elevation Tool

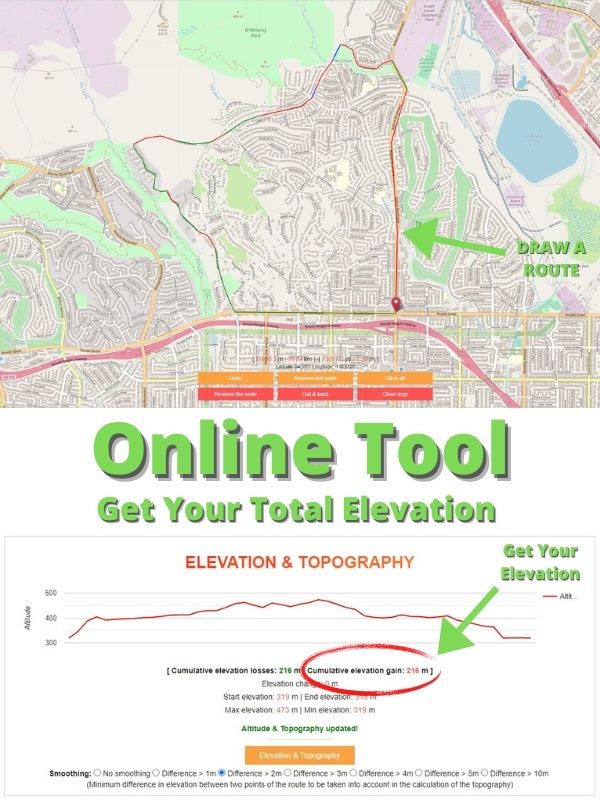
Credit – https://www.sportdistancecalculator.com/#map
There are several ways to calculate the distance and elevation during your ride. One way that is helpful if you want to determine how much elevation gain you will encounter on a route is to use an online tool.
I went to sportdistancecalculator.com to determine how much elevation gain would occur on the route in the picture above.
It started me out in New York but I zoomed out and changed the location to California where I live.
- All you need to do is click the map to set a starting point and then click the map for points along the way where the streets curve or change directions, and create a loop.
- After placing your last point on the map, click on “Close Loop” to create a complete path.
- Then, all you need to do is scroll down the page and click the button “Elevation & Topography Button.”
- You should see the calculation of the total elevation gain.
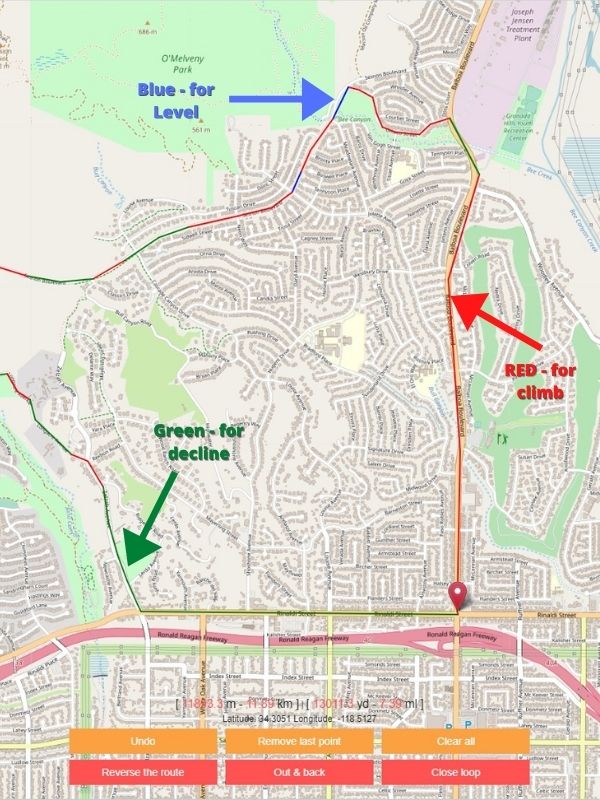
- Last, scroll up to the map to see the color-coded road sections for where the road goes up, down, or is level.
Here’s What your map should look like after your done.

Practice Before the Long Distance Uphill Ride

It’s a good idea to ease into uphill riding. If you’re already riding a lot, going uphill may not be too difficult unless it’s a long ride uphill. A long uphill ride requires more effort. You’ll want to practice different styles of riding such as sitting, standing, or both while riding on an incline.
Here are some things you might want to try before your first long uphill ride:
- Take some shorter rides that have hills and ride several times to get used to riding uphill. Depending on the grade and length of the hill, you may be able to ride with little practice, but if it is a long more difficult grade, practice for several weeks before the big ride.
- Getting into the habit of breathing properly. If your breathing is shallow, trying to breathe deeper can help you get into a habit of getting the oxygen you need. Sometimes you do need to take a break if your breathing is too difficult, but you may find that controlling your breath a bit more will help with the overall ride.
- The better health you’re in, the more likely your ride will be easier. Consider the exercise you do when off the bike. Are you doing leg exercises? To help strengthen the legs and prevent injuries, using weight to increase leg strength can be beneficial.
- Running can also help increase bone density since avid bikers tend to lose bone mass. If I’m only biking, my legs are getting a well-rounded exercise routine.
- How about your weight? If you could lose some weight, this can help you sustain longer periods of riding with less effort.
- Try to get into a rhythm while pedaling your bike uphill. Slowing down and speeding up requires more effort. A consistent speed will keep your energy levels in check. Try transitioning from sitting to standing and vise versa without too much variance in your tempo.
Final Thoughts
If you are going on a mountain climb for your next planned outing, being prepared can make all the difference in how much effort is required and how enjoyable your trip is. If you want to get the most out of your ride, consider taking a few steps to prepare.
If you’re like me, riding a bike feels very freeing. Going uphill and downhill can each have its rewards. I hope you can have a good experience while gaining elevation on your bike trip and that it’s all you hope for.
Thanks for visiting Helpshoe.com
References:
https://www.cyclingweekly.com/fitness/training/improve-your-climbing-353501
https://sheebes.com/resilience/cycling-with-no-power-in-your-legs/
https://blog.wahoofitness.com/by-the-numbers-distance-and-elevation/
https://theclimbingcyclist.com/gradients-and-cycling-an-introduction/

